Creating your own LogMX Parser
(to handle a new log format)
Page summary:
|
Useful links:
|
Introduction
LogMX can use 5 types of parsers to extract log entries from your logs:
- Log4j/Logback Pattern Parsers
- JSON Parsers
- Regular expression Parsers
- Simple Parsers
- Java Class Parsers
Creating the 4 first types of parsers consists in describing your log format directly through LogMX
graphical interface, then LogMX will create for you an internal Parser matching this format.
This page deals with the fifth type of parsers: Java Class Parsers. You can implement a LogMX Parser
by writing only one Java Class. Then compiling this class file in a dedicated LogMX folder will allow you
to use this Parser, the same way you use the three first parser types.
Creating such a Java Class Parser is the most powerful way to parse any kind of log format, from a simple
text file to a complex XML file, network stream, database, or any other resource.
To create and compile your Java Class Parser, you can use one of the following development environment (all available in
LogMX "parsers" directory): Eclipse, IntelliJ, Ant, Gradle, or Maven.
 Eclipse development environment
- Project import
In Eclipse, click on "File" menu, then "Import". Choose "General" > "Existing Projects into Workspace" in the dialog box
and click on the "Next>" button.
Click on the "Browse" button (in the upper right corner) and select LogMX directory before clicking the "OK" button.
You can unselect "LogMX Managers" if you don't want to write LogMX managers (see manager dev).
Then click on the "Finish" button.
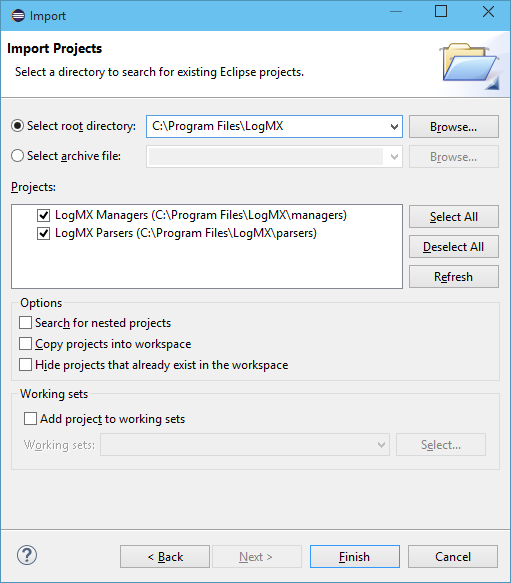 Eclipse project import Eclipse project import
- Project configuration (Jar file path)
In the "Package Explorer" view (usually on the left), right click on the new project "LogMX Parsers", and select
"Properties". In the new dialog box, choose "Java Build Path" on the left, and go to the "Libraries" tab.
Double-click the line "LOGMX_HOME/jar/logmx.jar".
[LogMX v5.3.3 or older]: Click on the
"Variable" button, then the "New" button. In front of "Name", type "LOGMX_HOME", then click on the "Folder" button
to choose your LogMX directory (e.g. "C:\Program Files\LogMX"). Finally, click on "OK" buttons to go back to the
"Libraries" tab.
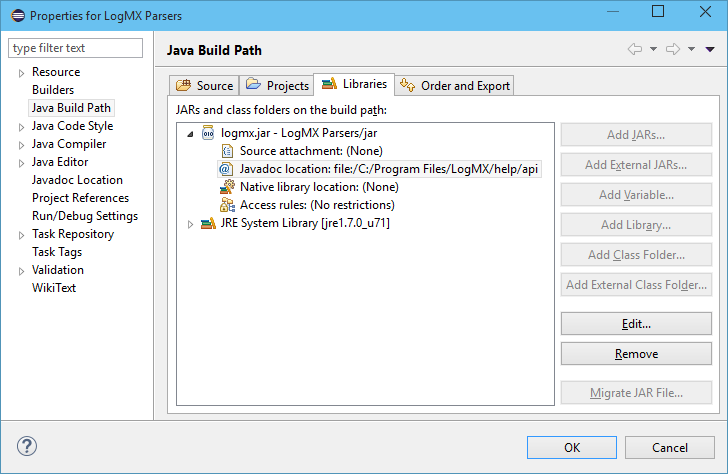 Eclipse project configuration: Build Path Eclipse project configuration: Build Path
- Project configuration (LogMX API Javadoc link)
Always in project properties dialog box, expand the item "logmx.jar" and double-click on
"Javadoc location". Click the "Browse" button and select the "help/api" directory of your LogMX distribution.
To finish, click on "OK" buttons to go back to Eclipse main window.
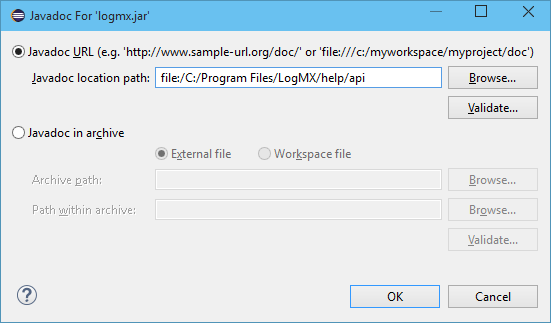 Eclipse project configuration: LogMX API Javadoc link Eclipse project configuration: LogMX API Javadoc link
- Creating your Parser
In the "Package Explorer" view, right-click on the "src" directory of your project, and then click
on the "New" > "Class" option. In the new dialog box, type a package name in front of "Package"
(e.g. "my.parser"). In front of "Name", type your Parser class name (e.g. "TestParser").
In front of "Superclass", type "com.lightysoft.logmx.mgr.LogFileParser" (or you can start typing
"LogFile" and use Ctrl-Space completion). Ensure option "Inherited abstract methods" is
checked, and then click on the "Finish" button.
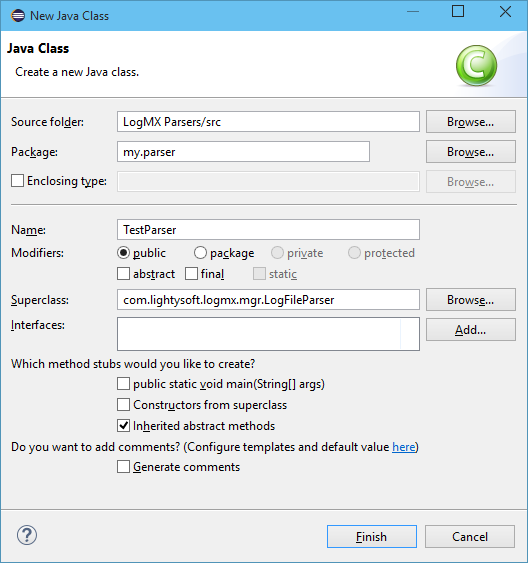 Parser class creation with Eclipse Parser class creation with Eclipse
You are now ready to implement your parser, see section Parser implementation for
more information.
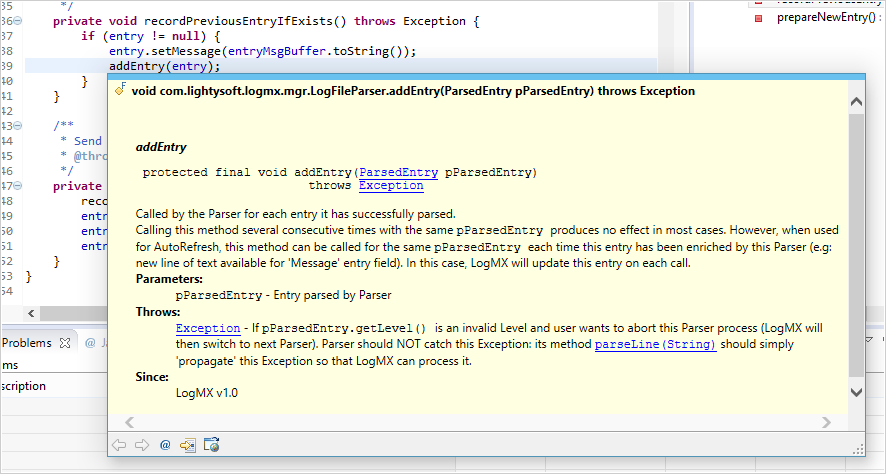 Parser development with Eclipse (here, LogMX API javadoc helping developper) Parser development with Eclipse (here, LogMX API javadoc helping developper)
You can now test your Parser in LogMX, see Parser test chapter.
 IntelliJ development environment
- Opening project
To open the IntelliJ project, you have to open the project file "intellij_parsers.ipr" in the LogMX "parsers/" directory
- On Windows, double-click on this project file.
- On any OS, if an IntelliJ project is already opened, use "File" > "Open". If no project is opened (i.e. welcome screen displayed)
click on "Open" option.
- Project configuration (JDK selection)
Once the project is opened, you will surely have to make it point to your currently configured JDK: at this time, IntelliJ needs a
name for the project's JDK which is specific to your IntelliJ configuration. IntelliJ project embedded in LogMX uses the name "1.7"
for its JDK: if yours is not named like this, you will need to set your JDK name in LogMX Parsers project to compile it. To set your JDK,
you can go to "File" > "Project Structure" > "Project Settings" > "Project". In "Project SDK" section, choose your current JDK
(Java 8 or greater). If you don't have any JDK, you can add one now using the button "New" at the right of the JDK selection combo box.
- Creating your Parser
In the "Project" tool view (generally on the left), right-click on the "src" directory, and then click on the "New" > "Package" option,
then enter a package name for your parser (e.g. "com.mycompany.parsers"). Then, always in the "Project" tool view, right-click on the package
you have just created, and then click on the "New" > "Class" option. Give a name to your class (e.g. "MyParser"), and choose the Kind "Class".
The first thing to do in your new Parser class is to add "extends LogFileParser" just after your class definition (use <Alt> + <Enter> at the end
to automatically import "LogFileParser" from "com.lightysoft.logmx.mgr").
Finally, use <Ctrl> + <I> (or menu "Code" > "Implement Methods...") to start implementing all required methods.
You are now ready to implement your parser, see section Parser implementation for
more information.
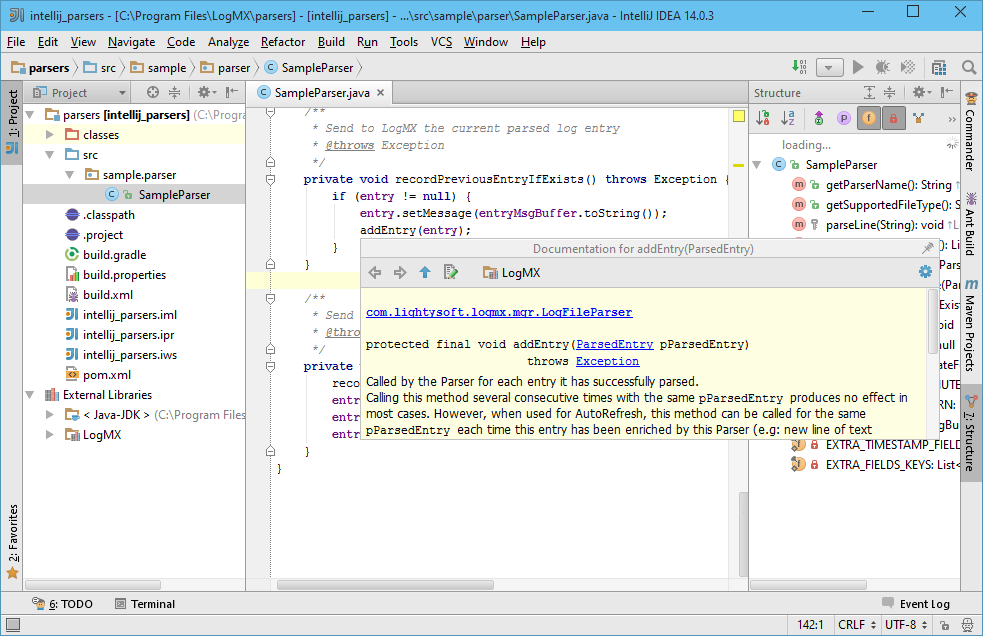 Parser development with IntelliJ (here, LogMX API javadoc helping developper) Parser development with IntelliJ (here, LogMX API javadoc helping developper)
You can now test your Parser in LogMX, see Parser test chapter.
 Ant development environment
- Creating Parser class file
In "parsers/src" directory of your LogMX distribution, create directories matching your
packages name (e.g. create "my/parser/" for packages "my.parser"). Create your Java class
source file in your package directory (e.g. file "TestParser.java" in "my/parser/").
You are now ready to implement your parser (using your preferred text editor), see section Parser
implementation for more information.
- Compiling Parser class file
Open a shell in the "parsers" directory of your LogMX distribution, and simply type
"ant" to compile in "classes" directory all parsers present
in "src" directory.
Here is the list of all available targets: (use "ant -p"
to get it from your shell)
| (default target) |
build-dev |
Build parsers for development (no optimize, all debug symbols) |
|
build-prod |
Build parsers for production (optimized, no debug symbol) |
|
clean |
Remove all generated class files |
You can now test your Parser in LogMX, see Parser test chapter.
 Gradle development environment
- Creating Parser class file
In "parsers/src" directory of your LogMX distribution, create directories matching your
packages name (e.g. create "my/parser/" for packages "my.parser"). Create your Java class
source file in your package directory (e.g. file "TestParser.java" in "my/parser/").
You are now ready to implement your parser (using your preferred text editor), see section Parser
implementation for more information.
- Compiling Parser class file
Open a shell in the "parsers" directory of your LogMX distribution, and simply type
"gradle" to compile in "classes" directory all parsers present
in "src" directory.
Here is the list of all available commands:
| (default task) |
gradle |
Build parsers for development (no optimize, all debug symbols) (equivalent to "gradle -P dev") |
|
gradle -P prod |
Build parsers for production (optimized, no debug symbol) |
|
gradle clean |
Remove all generated class files |
You can now test your Parser in LogMX, see Parser test chapter.
 Maven development environment
- Creating Parser class file
In "parsers/src" directory of your LogMX distribution, create directories matching your
packages name (e.g. create "my/parser/" for packages "my.parser"). Create your Java class
source file in your package directory (e.g. file "TestParser.java" in "my/parser/").
You are now ready to implement your parser (using your preferred text editor), see section Parser
implementation for more information.
- Compiling Parser class file
Open a shell in the "parsers" directory of your LogMX distribution, and simply type
"mvn" to compile in "classes" directory all parsers present
in "src" directory.
Here is the list of all available commands:
| (default goal) |
mvn |
Build parsers for development (no optimize, all debug symbols) (equivalent to "mvn -P dev") |
|
mvn -P prod |
Build parsers for production (optimized, no debug symbol) |
|
mvn clean |
Remove all generated class files |
You can now test your Parser in LogMX, see Parser test chapter.
Parser implementation
Writing a LogMX Java Parser consists in creating a Java class that extends the abstract
class LogFileParser and implementing
its abstract methods.
To get detailed information on these methods you have to implement, see our on-line
javadoc or
read it from your LogMX distribution (under "help/api").
For a complete example of Parser implementation, see "SampleParser.java" in directory "parsers/src/sample/parser"
of your LogMX distribution, or see it online: Parser class sample.
If you have any problem or question, please visit our
Parser Development Forum or
contact us.
Parser test
Here is how to test your Parser in LogMX:
-
Parser compilation
Compile your Parser to "parser/classes" (see above to compile it with Eclipse/IntelliJ/Ant/Gradle/Maven).
NOTE: If you have several versions of Java installed, be sure to run LogMX with a Java version greater
or equal to the version of the compiler you use to compile your Parser (you can run LogMX with
Java 9 to use a Parser compiled with Java 8, but you cannot run it with Java 8 to use a Parser
compiled with Java 9).
To get the version you use to run LogMX, go to "Help" menu, "About" option, and click on the
blue "i" icon in the left bottom corner: version is specified in front of property "java.version"
in the upper table.
To get the version you use to compile your Parser:
• with Eclipse, right-click on your Eclipse project and select the "Properties" option.
Then click on "Java compiler" in the left pane.
• with IntelliJ, right-click on your IntelliJ module ("Project" tool view) and select the option
"Open Module Settings". Then click on "Dependencis" tab.
• with Ant/Gradle/Maven, check your JAVA_HOME environment variable.
If you don't have such a variable, check the JDK directory of your PATH
environment variable: type "java -version" in your shell to get this Java version.
-
Parser installation
In the "Tools" LogMX menu, click on "Options...". In the dialog box that appeared, go to the "Parsers" tab
and click on the green "+" button on the right. In the new dialog box, go to "Java parser class" and
select your Parser in the main tree (as you can see in this dialog box, you can add Parsers included in a Jar file).
Of course, you have to do this only once, then LogMX will try to use this parser for every file you will open.
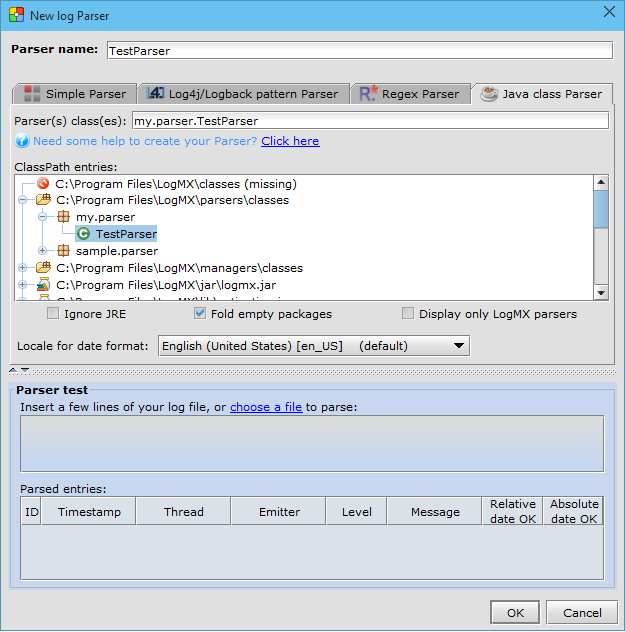 Parser installation in LogMX Parser installation in LogMX
-
Parser test
To test your parser, simply open a log file written in a format handled by your Parser.
If LogMX opens your file in raw-text mode or you get an error message, first try to make your
parser the first parser to be used: in "Tools/Options/Parsers" dialog box, click on your parser
and move it to the top of the list using the green-up-arrow button in the right pane.
If LogMX is still not able to open your log file properly and this file begins with
many lines before describing the first log entry, increase the amount of lines to read
from file before switching to next Parser if no entry found (bottom of "Tools/Options/Parsers" dialog box).
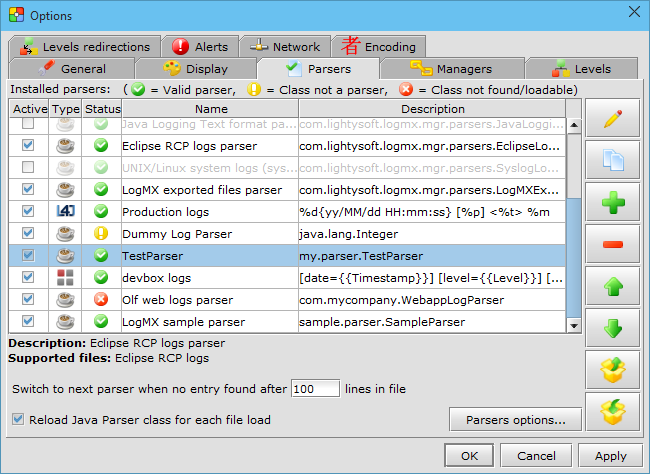 Parser configuration in LogMX Parser configuration in LogMX
If you recompile your parser, you shouldn't have to restart LogMX to use the last version of your parser
if you check the option "Reload Java Parsers for each file load" in the dialog above (this option can be turned off
for better performance, your Parser class file will then be stored in a cache).
|
|
 Eclipse development environment
 IntelliJ development environment
 Ant development environment
 Gradle development environment
 Maven development environment
 Eclipse development environment
 IntelliJ development environment
 Ant development environment
 Gradle development environment
 Maven development environment


